Hey guys, I wanted to share with you some strategies to install and optimize Ubuntu 24 LTS with minimal bloat and telemetry.
I appreciate that you may already have your favorite distro. This post is not intended to convert you to being a Ubuntu user. It’s simply aimed at sharing some information about how you may optimize it for privacy and security in potential future installs.
Even if you do not daily-drive Ubuntu, there are many reasons why one would want to consider installing it:
- For a VM
- For a relative/friend who’s not very technologically-savvy and need stability
- For achieving maximum compatibility (hardware + software)
- To flash GrapheneOS (it’s one of the supported distros)
- To install specific apps more easily that are designed for Debian-based distros
- To have a solid setup with Secure Boot + NVIDIA drivers
I would say that Debian 13 is an aswesome alternative if you have a firm stance against Canonical. I understand it. However, if you have an NVIDIA GPU there may be a chance you brick your OS when you install the drivers because it messes up with secure boot. If like me, you refuse to use a machine without secure boot, then Ubuntu might be for you - provided you optimize it. Here we go guys.
Below I provide some key steps for you to consider during installation and after installation.
During installation (do these at the installer screens)
1) “What apps would you like to install to start with?”
Pick “Default selection: just the essentials, web browser and basic utilities”.
Why: it’s clean, fast to install, and avoids bloat you’ll remove later anyway. This is the “minimal” install and gets rid of lots of bloat by default. I love it.
2) “Install recommended proprietary software?”
Choose Only if you need it. For example, select yes if you have an NVIDIA GPU.
Why: this adds drivers/codecs; helpful for specific hardware, unnecessary otherwise.
3) “How do you want to install Ubuntu?”
For the love of good, use encryption: choose “LVM and encryption”.
Why: In case it’s not obvious enough why you need this, full-disk encryption protects your data if your device is lost or stolen. LVM also makes partition management easier later and when you need to dispose your disk, then you have peace of mind that its contents will remain inaccessible to adversaries as there is no such a thing as deleting files from modern storage devices (e.g., NVMEs, SSDs, etc).
Ok, you now have installed Ubuntu LTS with its minimal settings. Well done.
First boot: what phones home?
Right after you enter your LUKS password and hit the GNOME login screen, if you’re watching DNS with Pi-hole or NextDNS, you’ll see Ubuntu contacting a few domains. Expect at least four: three “mothership” calls plus a time sync. After poking around a bit more, you may also catch a call to metrics.ubuntu.com. We’ll neutralize the noisy ones shortly. Hang in there.
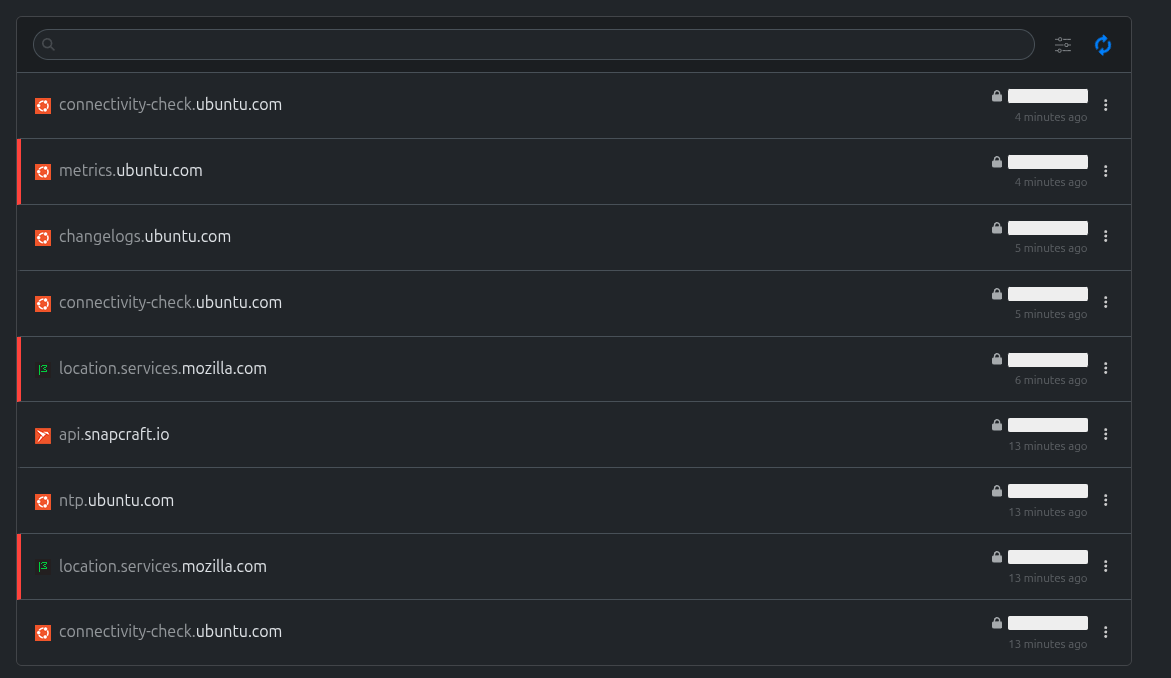
api.snapcraft.ioandntp.ubuntu.comare normal: one handles snaps, the other syncs your clock.connectivity-check.ubuntu.comis a low-key telemetry-ish connectivity probe. We’ll disable it safely.location.services.mozilla.comcomes from GNOME’s geoclue service (not Ubuntu itself). We’ll… politely retire geoclue as well.
Now, log in normally with your user password.
Post-installation welcome screens
You’ll get Ubuntu’s Welcome flow:
- Click Next, skip “Enable Ubuntu Pro”.
- When asked to “Help improve Ubuntu,” select “No, don’t share system data” .
(You’re about to disable telemetry anyway).
Press Next & Finish. If you hit SUPER + A, you’ll see a refreshingly lean app spread. “Help” is pinned on the sidebar. We’ll remove it from the system in a minute.
Let’s open the terminal and get ready for some action!
Hit CTRL + ALT + T to open Terminal. We’ll start with updates, then prune telemetry and extras.
1) Update and upgrade the system
What it does: refreshes package lists and installs the latest fixes.
Run:
sudo apt update && sudo apt upgrade -y
2) Remove telemetry/bloat (and the Help app)
What it does:
ubuntu-reportandpopularity-contest: send hardware/package stats.apport,apport-symptoms,whoopsie: crash reporting stack.network-manager-config-connectivity-ubuntu: that connectivity probe we discussed.yelp: GNOME Help app (we’re removing it and its pin).
Run:
sudo apt purge -y ubuntu-report popularity-contest apport apport-symptoms whoopsie network-manager-config-connectivity-ubuntu yelp
sudo apt autoremove -y
3) (Optional) Quiet the “Message of the Day” news
What it does: stops Ubuntu from fetching dynamic MOTD news from the internet and disables its timers.
sed -i 's/^ENABLED=.*/ENABLED=0/' /etc/default/motd-news        # disable pull from motd.ubuntu.com :contentReference[oaicite:4]{index=4}
systemctl --quiet disable --now motd-news.service motd-news.timer || true
4) Disable GNOME geolocation (geoclue)
What it does: turns off system location lookups (which trigger location.services.mozilla.com). I do not recommend this, but if you need location later (e.g., for weather), you can re-enable it. Alternatively, you can install gnome-weather and specify a location.
sudo systemctl stop geoclue.service
Then:
systemctl disable geoclue.service
And:
systemctl mask geoclue.service
4) Change Ubuntu’s time server to mix with the crowd and be less fingerprintable
First, open the time sync configuration in Nano (your friendly, no-frills text editor):
sudo nano /etc/systemd/timesyncd.conf
Inside the file, find the line that starts with #NTP. The # means “ignore this”. Remove the # (that’s called uncommenting) and set it to a server you trust. I always use the one below because it’s popular and makes me blend in nicely with the crowd:
NTP=pool.ntp.org
You can also add backups by separating them with spaces because even time servers need a nap sometimes:
NTP=pool.ntp.org time.esa.int
Save and exit Nano by pressing CTRL + X, then Y, then Enter. (It’s the Konami code for text files, minus the boss fight).
Now restart the time sync service so your changes actually take effect:
sudo systemctl restart systemd-timesyncd
Finally, confirm everything’s ticking along with your chosen servers:
timedatectl status
You’re looking for “NTP service: active” and “System clock synchronized: yes”. If it
isn’t instant, give it a moment. Ironically, time sync sometimes needs… time.
Snaps: keep them, fence them in, or yeet them entirely
Ubuntu ships with snaps by default. You can 1) leave them, 2) disable the services (gentle), or 3) purge snaps and block them from coming back (spicy ![]() ). We’ll also install a browser from traditional repos/Flatpak so you’re not stranded.
). We’ll also install a browser from traditional repos/Flatpak so you’re not stranded.
Check what snaps are installed (Relax, we’re just looking)
snap list
If you want to remove the Snap Firefox first (to avoid weirdness while you transition), do:
sudo snap remove --purge firefox
Heads-up: you’ll have no browser for a minute. The plan is to install Mullvad Browser from its Debian/Ubuntu repo and/or optionally Brave next, then set up Flathub (see Ubuntu Flathub Setup | Flathub) for Flatpaks.
Install Mullvad Browser (APT repo) Disclaimer always check and follow the official installation guidance here: Mullvad Browser for Linux
What it does: adds Mullvad’s signing key and repo, updates packages, then installs the privacy-hardened browser.
#Install curl as Ubuntu minimal has no curl in it (yeah baby, we're lean!)
sudo apt install curl -y
# Download the Mullvad signing key
sudo curl -fsSLo /usr/share/keyrings/mullvad-keyring.asc https://repository.mullvad.net/deb/mullvad-keyring.asc

# Add the Mullvad repository server to apt
echo "deb [signed-by=/usr/share/keyrings/mullvad-keyring.asc arch=$( dpkg --print-architecture )] https://repository.mullvad.net/deb/stable stable main" | sudo tee /etc/apt/sources.list.d/mullvad.list

# Install the package
sudo apt update
sudo apt install mullvad-browser
(Optional) Install Brave too: Why not?
What it does: runs Brave’s installer script. As always with “curl | sh,” only do this if you trust the source (here: Installing Brave on Linux | Brave).
curl -fsS https://dl.brave.com/install.sh | sh
Option A: Disable snaps by masking it (less aggressive)
What it does: stops snap services and prevents them from auto-starting, without removing existing snap files.
Stop the daemons:
sudo systemctl stop snapd.socket
sudo systemctl stop snapd
Ensure they have been stopped:
sudo systemctl status snapd.socket
sudo systemctl status snapd
Mask the services so they can’t be started:
sudo systemctl mask snapd.socket
sudo systemctl mask snapd
If you change your mind later, unmask to re-enable:
sudo systemctl unmask snapd
sudo systemctl unmask snapd.socket
Option B: Disable snaps by purging it (more aggressive)
You’re making a statement. I hear the tiny violin playing the Canonical anthem in the background. Let’s go, responsibly.
Stop snapd and snapd.socket:
sudo systemctl stop snapd.socket
sudo systemctl stop snapd
Now, let’s obliterate snaps and existing folders:
Remove snapd (stop and purge it first):
sudo systemctl stop snapd snapd.socket 2>/dev/null || true
sudo apt purge -y snapd
Unmount any stale snap mounts (harmless if none exist):
for m in /snap/*; do
  [ -d "$m" ] && sudo umount "$m" 2>/dev/null || true
done
Remove system-wide snap directories:
sudo rm -rf /var/lib/snapd
sudo rm -rf /var/snap
sudo rm -rf /snap
sudo rm -rf /var/cache/snapd
Remove per-user snap data:
rm -rf "$HOME/snap"
sudo rm -rf /root/snap
sudo rm -rf /home/*/snap 2>/dev/null || true
Block snapd from being installed again:
printf "Package: snapd\nPin: release a=*\nPin-Priority: -10\n" | sudo tee /etc/apt/preferences.d/nosnap.pref >/dev/null
sudo apt update
Note: this is the extreme route. It usually works fine (I’ve done it many times), but treat it like removing the pull-cord from a lawnmower: reversible, but with elbow grease. After running it, you might briefly see a bunch of volumes on your dock; they go away after you log out/in or reboot.
Regret is human and you can change your mind . To reinstall snap later:
sudo apt update
sudo apt install snapd
sudo systemctl enable snapd
sudo systemctl start snapd
GUI privacy polish (low-hanging fruit)
Open Settings → Privacy & Security and make these tweaks:
- Connectivity: disable.
(This turns off the captive-portal/”am I online?” probe—what we disabled at the package level). - Location: disable (if geoclue wasn’t already stopped, this also prevents app prompts).
- File History & Trash:
- File History = disable, then Clear history.
- Trash & Temporary Files:
- Automatically Delete Trash Content = Enable
- Automatically Delete Temporary Files = Enable
- Automatically Delete Period = pick what suits you (I use 1 day, but you do you).
- For peace of mind: click Delete Temporary Files… and Empty Trash…
To wrap things up… This is what NextDNS shows after my first reboot without installing anything (i.e., just after cleaning things up with the instructions above):
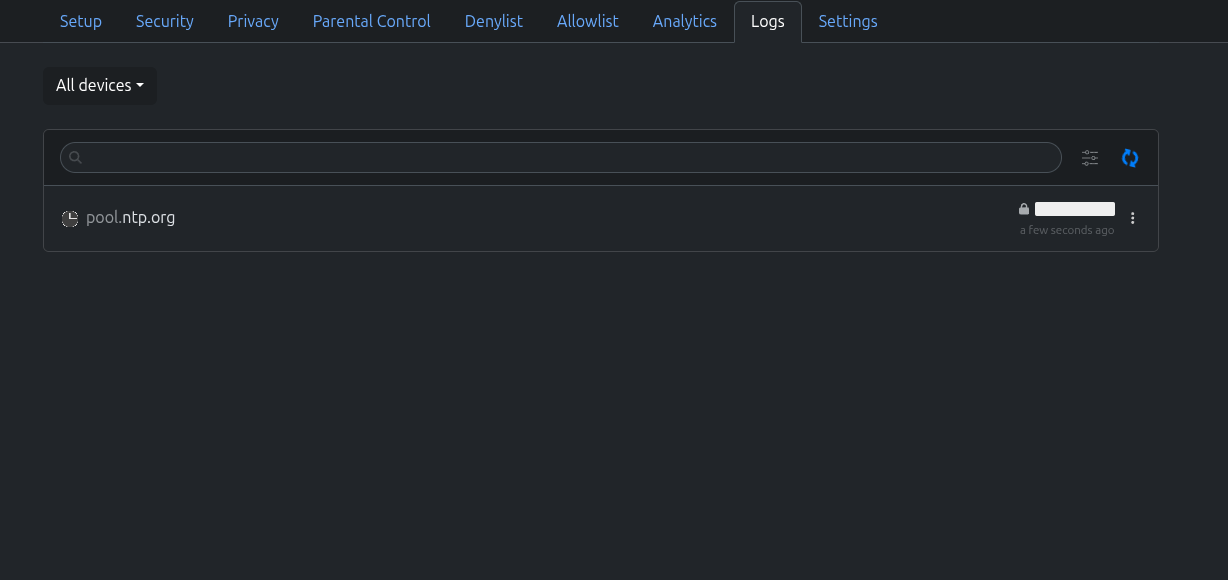
And this is what it looks like once the full steps above are applied:

As you can see, there’s nothing really alarming here. This setup allows you to have a very “quiet” distro. In fact, a lot quieter than many mainstream distros that calls lots of domains on boot. I have tested quite a few lately and I am satisfied with this.
Let’s take a moment to appreciate what we have accomplished. We’ve now:
- Chosen a minimal, encrypted install of a highly and widely comaptible distro.
- Turned off first-boot telemetry and geolocation lookups.
- Used a public time server that is not tied to a particular OS/distro.
- Pruned crash reporters and connectivity probes.
- Quieted the MOTD news ticker.
- Swapped Snap for a classic repo/Flatpak world (or at least put it in a time-out).
- Installed privacy-respecting browsers.
- Tightened privacy in GNOME’s settings.
This gives you a lean, private, secure, and speedy Ubuntu that does what you want and a lot less of what you don’t. If you ever need those features back, you know exactly how to reverse the switches. Until then, enjoy the calm hum of a system that minds its own business.
If you like this type of tutorial/guide let me know and I may consider posting new ones in the future. Also, if you believe I need to correct anything here, please do let me know. If there are any additional useful steps, please share here in the comments!
P.S.: I have ran and tested the steps above myself in August 2025. Things may change in the future.